Tag: filmisnotdead

  • Retr0brite the Pakon

    Retr0brite the Pakon

    Have you ever noticed that some of those white/light plastics products you own have yellowed over time?  Or perhaps, like me, you recently bought a used device from yesteryear, like a Kodak Pakon F-135 scanner.  Most of these products are made of ABS plastic (known for its properties in resistance and toughness), and luckily the color of the plastic is in fact salvageable.  A coworker of mine informed me about this process and his experiences with Retr0brite-ing older Mac computers.  I was intrigued, curious, and figured that I had nothing to lose so as long as the scanner still functioned properly after I was done.

    Admittedly, I didn’t follow all of the rules or completely follow one of the many tutorials on Youtube.  We decided that we would sort of take the shortest, most efficient, but maybe not the most comprehensive route, so if you’re into a quick fix, this tutorial is for you.  Besides, the discoloration, wasn’t that bad compared to some before/after shots I have seen from others.  If you are all about doing things the right way, you may want to leave now before you cringe to death or want to tell me how terrible my process was.  Trust me, I already know.

    **Disclaimer, photos are a tad grainy.  Time for a new batch of chemicals to be made.**

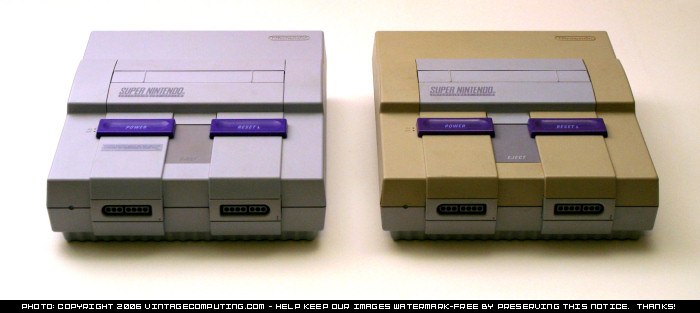
    To start, this is what the Pakon looked like prior to the process with all of my materials besides the screwdrivers.  The bottle of peroxide provides a good distinction of colors:

    30548294345_317b9df865_b
    Voigtländer Bessa R3A // Portra 160, Materials for Retr0brite

    As for materials to conduct the process, all you need is the following:

    • Screwdriver set (Phillips & Torx)
    • 40 Volume Peroxide 
    • Direct sunlight
    • A surface to work on
    • Some sort of liner to protect the surface (i.e. a garbage bag)
    • Gloves
    • About 2 hours of your time

    To get started, you have to flip the Pakon over and remove the top case by removing a handful of screws, I think there were 6 or 8.  The nice thing about taking the Pakon apart is that it was designed to be easily fixed by the photolabs that owned them.  No disconnecting wires, no fragile parts directly in your way, nothing.  I have had to take my Pakon apart quite a few times because of inconsistent Polling errors in the TLX software due to dust on the tiny film sensors.  It’s a pain to do this every time it happens, but I’m looking into purchasing a dust cover in the near future.  Anyhow, here is what the unit looks like after the top is off:

    30512338436_df58e98d83_b
    Voitländer Bessa R3A // Portra 160

    Again, super easy.  Time to take all the materials outside.  Be sure to keep the screws in safekeeping in the meantime.

    30512334966_37d133004e_b
    Voigtländer Bessa R3A // Portra 160

    Once we got outside and all situated, the rest of the process was just as easy with a bit more periodic involvement.  Basically all we did was pour a generous amount of peroxide on the case every 15-20 minutes or so.  After pouring it on, we lathered it around for about 2-3 minutes, making sure to apply it evenly throughout the piece and turned it 90 degrees on the table each time.  We let it sit for the remainder of the 15 minute increment.  This was done not only produce a balanced color in the end, but to also prevent color scarring (see top image) since the peroxide was so highly concentrated.  We did get a little bit of scarring in the final product, so we may try this process again with a less concentrated solution, perhaps 20 volume or so.  I think I’m okay with the improvements I got from this single process.  Minor note, I also tried to be careful around the film entries, but I didn’t bother covering them.

    29917664264_7d6f4c7179_b

    30512333676_f1f28eed0a_b

    30460617191_85316eccbf_b

    After an hour or so of doing this (we may have did an hour and a half), we cleaned up, rinsed off the top case in the sink with tap water and let it dry.  We screwed it back on top of the base, and I couldn’t really complain about the result:

    It’s not perfect, but it’s definitely an improvement.  I get a little sense of pride every time I see the scanner on the shelf when I walk in the room.  The change is slightly better seen in person, or maybe I am just color-biased every time I look at it.

    Again, my process is in no way the “right way” of doing things, but if you get a result that you are happy with, I guess it doesn’t matter much.  This blog was created with the goal of focusing on the process and not the result anyway.

    If you have done something similar, I would love to hear about your experience.  If you try out this process, I would also like to see how well yours turned out.

  • Squeegee Streaks

    Squeegee Streaks

    I recently picked up a Voigtlander Bessa R3A with a 40mm f/1.4 Nokton.  I think I have finally found my end-game camera for 35mm shooting.  Well, at least for now.  I know many people say that the build quality and shutter sounds between the Bessa and the Leica M series are almost incomparable in the Leica’s favor, but I don’t think I’ll be jumping ship any time soon despite the fact that many people make the jump from Voigtlander to Leica.  I am entirely satisfied with the sharpness of the lens and the comfort of the camera in my hands.  The only issue I have had with the Bessa I picked up was that the film winding lever is a bit loose and flips out quite often.  It ended up getting stuck while trying to advance the film and I ripped the film a bit, creating an accidental double exposure that has become one of my favorite images I’ve taken.  Luckily, I didn’t have any issues ratcheting the film onto the development reel and had a successful development with the first roll from my R3A.

    An issue I noticed on my last black and white roll (see photos in my last post) as well as this one, was a sort of horizontal banding that only showed up in my black and white film.  I wasn’t sure if this was a Pakon issue or a development issue, but upon further investigation, it turns out I have been scratching my film pretty bad while squeegeeing it prior to hanging it to dry.  I suppose the color film appears safe from these scratches due to the Digital Ice technology in the Pakon, but shows up on the monochrome film because you can’t use the infrared-based feature with black and white film, this leaving more imperfections than the C41 color film.  Needless to say, I decided to pony up and buy a bottle of Photo-Flo so I do not have to risk severely scratching my film anymore.

    29686439102_28418c0ae4_b
    Voigtlander Bessa R3a // Arista 100
    29686434772_afe0078761_b
    Voigtlander Bessa R3A // Arista 100
    29686435932_c77480a4de_b
    Voigtlander Bessa R3A // Arista 100
    29686430392_36e9a0521b_b
    Voigtlander Bessa R3A // Arista 100
    29686429812_45152267cf_b
    Voigtlander Bessa R3A // Arista 100
    29686427732_e2d68e9bcb_b
    Voigtlander Bessa R3A // Arista 100
    29686426722_0c0f9c48c5_b
    Voigtlander Bessa R3A // Arista 100
    29799086195_d90f6e7e5b_b
    Voigtlander Bessa R3A // Arista 100
  • Imparting Knowledge

    Imparting Knowledge

    As many of you know, I am a middle school teacher.  I’m probably a bigger kid than most of my students and it’s probably why I enjoy my job so much.  Middle school is such an awkward and odd age filled with hormones and creating your own identity.  If there is one thing I hope my students leave with is not so much the content that I teach them, but the feeling of security in knowing that it’s okay to be your own person, love the things you enjoy doing, and being proud of who you are; never second-guessing your enthusiasm  and expression for the things you love and care about.

    Every school year, I run an after-school film photography club for my students.  I usually cap it off at about twenty students per year.  I keep the numbers low because it’s more manageable and I want to make sure the each child gets enough of my attention.  I separate them into two groups of ten and teach the first group for the first quarter of the school year and the second group during the second quarter of the year.

    The students that take my class grow so much from their time shooting film, and every year it literally causes me to choke on my tears when I make a speech at their first gallery showing at the school just before the Holiday break.

    I prefer give my rookie students (usually sixth graders) point and shoot cameras and teach them some basic shooting concepts.  I give my returning students (who basically become my teaching assistants) SLRs.  The students are given weekly assignments on what to shoot each week before our next meeting.  We all shoot black and white film and develop it in the school’s science lab.  We use darkroom bags, Patterson tanks, Arista film and chemicals, and a Pakon F135 scanner to get the job done.

    I must mention that NONE of this would be as successful as it is now without the help of Michael Raso of the Film Photography Project.  The FPP has run features on my students in numerous episodes of their podcast, donated somewhere around sixty total cameras, and Michael continues to be a close colleague for both me and the students.  So a thank you is definitely warranted to them.  A thank you is also warranted to the local press who ran a feature of us last year as well.  That article had a few awesome quotes from students on their time in the club.

    I must say that there is no better feeling than seeing my students crack the reel and see their images on a strip of film for the first time.  The amazement in their eyes and the look of fulfillment and relief on their faces is something I truly enjoy.  Of course, not every student nails it their first time, but we all work and support one another to make sure we all get there eventually.

    I know I am teaching the kids a lot in the nine weeks I spend with each group, but I feel like I learn and benefit way more.  They push me to learn more so I can teach them more.  It’s a shame I don’t have an arts degree, because there’s an adjunct opening for Photo 101 at the local Community College and it would be pretty cool to further my photography teaching experience in the evenings.  But for now, this is more than enough to keep me happy.

    29527439166_ddf4cb5515_b
    Fujica ST605 // Arista 100
    29527429216_9dc4678522_b
    Fujica ST605 // Arista 100
    24028816093_10ce827286_b
    Pentax ME Super // Kodak 200
    24359904210_0473664f8d_b
    Pentax ME Super // Kodak 200
    24655619625_e2aac99922_b
    Pentax ME Super // Kodak 200
    29527436906_a5c720a35d_b
    Fujica ST605 // Arista 100
    29271523890_40e0c3a094_b
    Fujica ST605 // Arista 100
    28938357833_db1778bc36_b
    Fujica ST605 // Arista 100
    29527434716_d003b039e8_b
    Fujica ST605 // Arista 100
  • The End of an Era: Contax G1

    The End of an Era: Contax G1

    Ever since I got into shooting film, it was like a whole new world opened before my eyes.  Aside from the different formats of film I could choose to shoot, I also had thousands of cameras to research and choose from.  I have been lucky enough to get my hands on many different cameras over the past few years, getting to learn more and more about the nuance and design of each company and model through the time I got to spend and shoot with them.  I also love that fact that each used camera I acquire and pass on has its own story to it.  It makes the experience of shooting film and these older cameras that much more of an intimate experience for me, personally.

    This week, I finally decided that it was time to try something new again and I’ll keep that new camera excursion as a secret for now, but today is a bittersweet day as I sold and shipped off my Contax G1 to it’s newest owner.  I bought this camera along with a black Biogon 28mm f/2.8 which very rarely came off of the camera, even after I purchased a 90mm Sonnar f/2.8 to do some more portraiture with the camera.  The 90mm never impressed me as much as the 28mm did; it just wasn’t nearly as versatile or quick, and at 90mm, you really start to see the slow speed of the autofocus that accompanies the G1 through the online community.  One of my other favorite features of this camera was definitely the built-in multiple exposure mode.  Overall, it was also pretty quiet, which made it fun to shoot in the street.  I wasn’t a big fan of the manual focusing system, though.  Pros and cons, right?

    But since this camera has traveled quite a bit of land and spent quite a a bit of time with me, I figured I would post some highlights from my time with it.

    29478721766_c88995bfc2_k

    25239530334_01cf498555_k

    24507436232_a7c1f227b4_k

    23987603604_f6d16bc80c_k

    24156833343_b2ea5535bd_k

    24155569204_75b34aca0c_k

    24757452986_7a4c3524c2_k

    25843992956_708c124c5c_k

    25749106522_9c3bd87620_k

    25569341780_943bf1f89d_k28136376785_c011210030_k

    28101726886_308bea76a6_k

    29478734526_8a0cfa0052_k

    29432627331_f389d8472d_k25749108482_c96e9494b8_k25843988906_5c4fc20ba3_k28136381265_c173c4ba66_k29512888575_cedcc6c82f_k

  • Portland, OR and the Pacific Northwest

    Portland, OR and the Pacific Northwest

    One of the best perks of teaching that isn’t related to teaching has got to be the summer vacation.  Every other summer, I try to take a worthwhile trip that lasts approximately two weeks.  This past summer I finally made it out to the Pacific Northwest.  I even got to see the Grand Canyon for the first time, albeit from an airplane, but I saw it nonetheless.  I got to spend a few weeks with one of my closest friends, Ryan, who is also an amazing photographer & visual artist, as well as the person I started taking pictures with when we were just sixteen years old.

    Most of the trip, probably about ten of the fourteen days, were spent in Portland and the surrounding area.  The remaining days were spent taking road trips to various landmarks, parks, Cannon Beach, Astoria, and Seattle.  The best part of staying for two weeks was that it allowed for a real good mix of doing the typical “tourist-y” things and really getting to spend enough time embedded in the city’s culture and feel like I’m living there for a short amount of time rather than just visiting.

    Exploring a new place with someone familiar gives off a unique feeling, a certain type of “new nostalgia.”  We filled a lot of the silence talking about our teenage years and listening to bands that we grew up listening to like Taking Back Sunday, Saves the Day, The Spill Canvas, and countless others.  In a sense, many of the road trips we took during those two weeks in our fire red Hyundai Accent rental car felt just the same as the ones we took a decade ago in my  beat up, blue Ford Taurus.


    28136994685_cdfab6b6d4_b
    Ricoh GR1 // Portra 400
    27457300593_32a41994cc_b
    Mamiya 6 // TMax 400
    27457770503_6a804f407f_b
    Mamiya 6 // TMax 400
    27457785343_5aec2ce63a_b
    Mamiya 6 // TMax 400
    28037264956_c396cef95e_b
    Mamiya 6 // TMax 400
    28057794201_12f8a5ea67_b
    Contax G1 // Ektar 100
    28057801191_401197b30d_b1
    Contax G1 // Ektar 100
    28057372591_0daaf5e809_b
    Olympus Mju II // Rollei Chrome 200 (C41 Cross Process)
    28057466031_5f8cfef90f_b
    Olympus Mju II // Rollei Chrome 200 (C41 Cross Process)
    28057787581_7f3e75cd30_b
    Ricoh GR1 // Portra 160
    27855256960_1cc31c7813_b
    Ricoh GR1 // Ektar 100
    27521502324_f517a319cb_b
    Contax G1 // Ektar 100
    28667710433_a20e542ef8_b
    Mamiya 6 // Portra 160
    28550401233_e7291121be_b
    Mamiya 6 // Ektar 100
    29181037406_99896dc0e7_b
    Mamiya 6 // Ektar 100
    28927375300_db6a9039bd_b
    Mamiya 6 // Ektar 100
    28101643196_fe354e3f45_b
    Contax G1 // Portra 160
    28057771331_974ee98ffe_b
    Ricoh GR1 // Ektar 100
    28101748916_2fcfacc3a5_b
    Ricoh GR1 // Ektar 100
    28927246610_6fbd07d852_b
    Mamiya 6 // Portra 160
    29136902161_50510458db_b
    Mamiya 6 // Portra 160
    29215453125_390c89af95_b
    Mamiya 6 // Ektar 100
    29288133005_b890c35bb1_b
    Mamiya 6 // Portra 160

    When it came to developing the 120 film from this trip, I had a few complications and it seemed like every time I developed and scanned a roll, something would go wrong.  I sort of narrowed down the issues to occurring somewhere in the shooting and development process.  Two of my rolls were so underdeveloped that they were basically unusable.  The grain was so thick that it looked more like pixelated noise (which in a sense, it was), causing me to think that my scanner was broken.  I am still not sure if I shot the film at the wrong ISO rating, if the film was ruined by security scanners in the airport, or if I did something wrong without realizing it in the development process.

    I’m definitely not a professional by any means and as stated in my previous post, my images will be riddled with errors.  These sort of issues come with the territory of developing your own film and you always run the risk of losing images that you only had one chance to take in that moment of time.  I find it to be exciting and nerve racking at the same time; knowing you may or may not be able to salvage those memories in a physical form.  I take a lot of time composing images with my Mamiya 6, and I vividly remember snapping the images that are unusable, so at least I still have those snapshots recorded in memory.